

Construction teams in New York and the San Francisco Bay Area lose hours every week hunting through unorganized photo libraries, sending bloated image files that slow down project communication, and confusing inspectors with mislabeled documentation. This guide covers the essential best practices for compressing and naming construction images so your projects stay organized, your files load fast, and your documentation holds up professionally from the first site visit to final closeout.
If you’ve ever sent a photo to a subcontractor and heard “I can’t open that” or scrambled through 400 identically named files labeled IMG_3847.jpg the night before a site inspection, you already know the problem. Construction photography is a critical part of project documentation, but most teams treat it as an afterthought. Compressing images properly and naming them consistently isn’t just a technical housekeeping task. It’s a workflow decision that directly affects communication speed, liability protection, and how your team performs under deadline pressure.
Key Takeaways
- Consistent file naming eliminates search time and protects you legally during disputes or inspections.
- Compressing construction images reduces file size without sacrificing the visual quality needed for documentation.
- A naming convention should include project code, date, location, and phase at minimum.
- The best time to compress and rename files is immediately after capture, before they enter your project management system.
- Teams that standardize image workflows spend less time on administrative rework and more time building.
- Both New York and San Francisco Bay Area contractors face high-volume documentation demands that make these practices especially valuable.
Why Do So Many Construction Teams Struggle With Image Management?
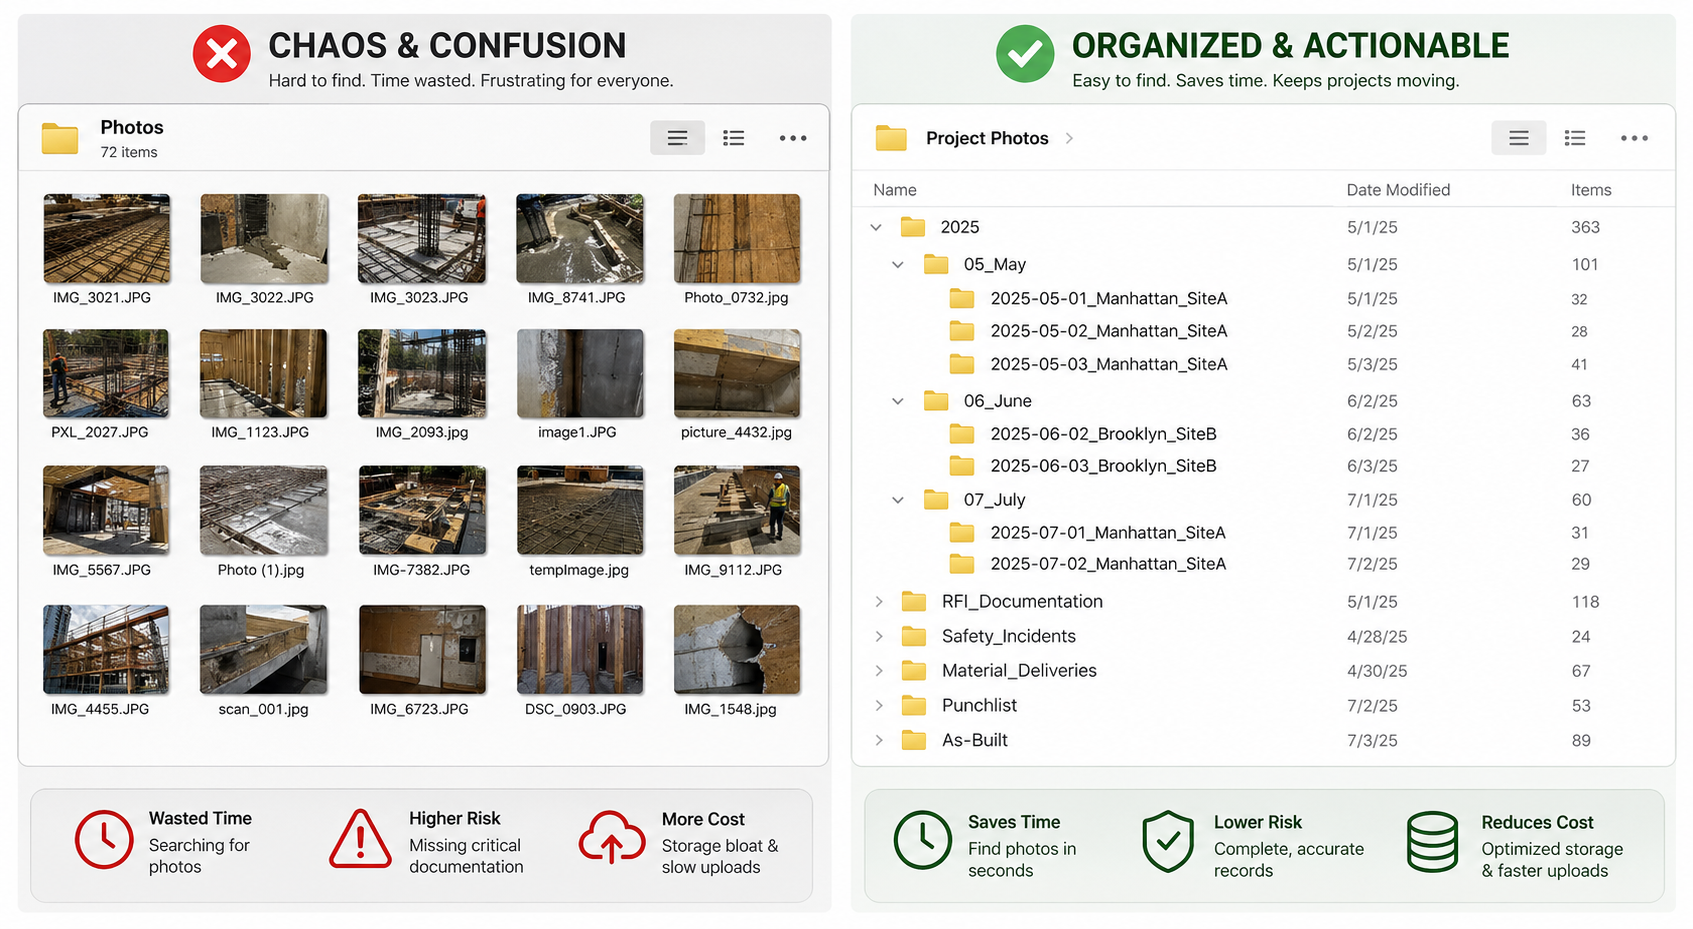
The construction industry generates an enormous volume of photographic documentation. Progress photos, RFI documentation, safety incidents, material deliveries, punchlist items, and as-built conditions all rely on images to tell an accurate story. On a mid-size commercial project, a site superintendent might capture dozens of photos daily across multiple phases and locations.
Studies across the construction sector suggest that field teams spend up to 35% of their administrative time searching for information, including photos and documents, rather than using that time productively. Poor file organization is consistently cited as a top contributor to project delays and communication breakdowns between field staff and project managers.
The problem compounds quickly. Uncompressed images from modern smartphones can exceed 8 to 12 megabytes each. When your team is uploading hundreds of those images to a shared drive or project management platform, storage bloat becomes a real cost, and slow upload times during site visits frustrate everyone involved. On a fast-moving New York high-rise project or a Bay Area renovation with multiple concurrent inspections, a clogged system isn’t just inconvenient. It’s a liability.
What Does a Good Construction Image Naming Convention Actually Look Like?
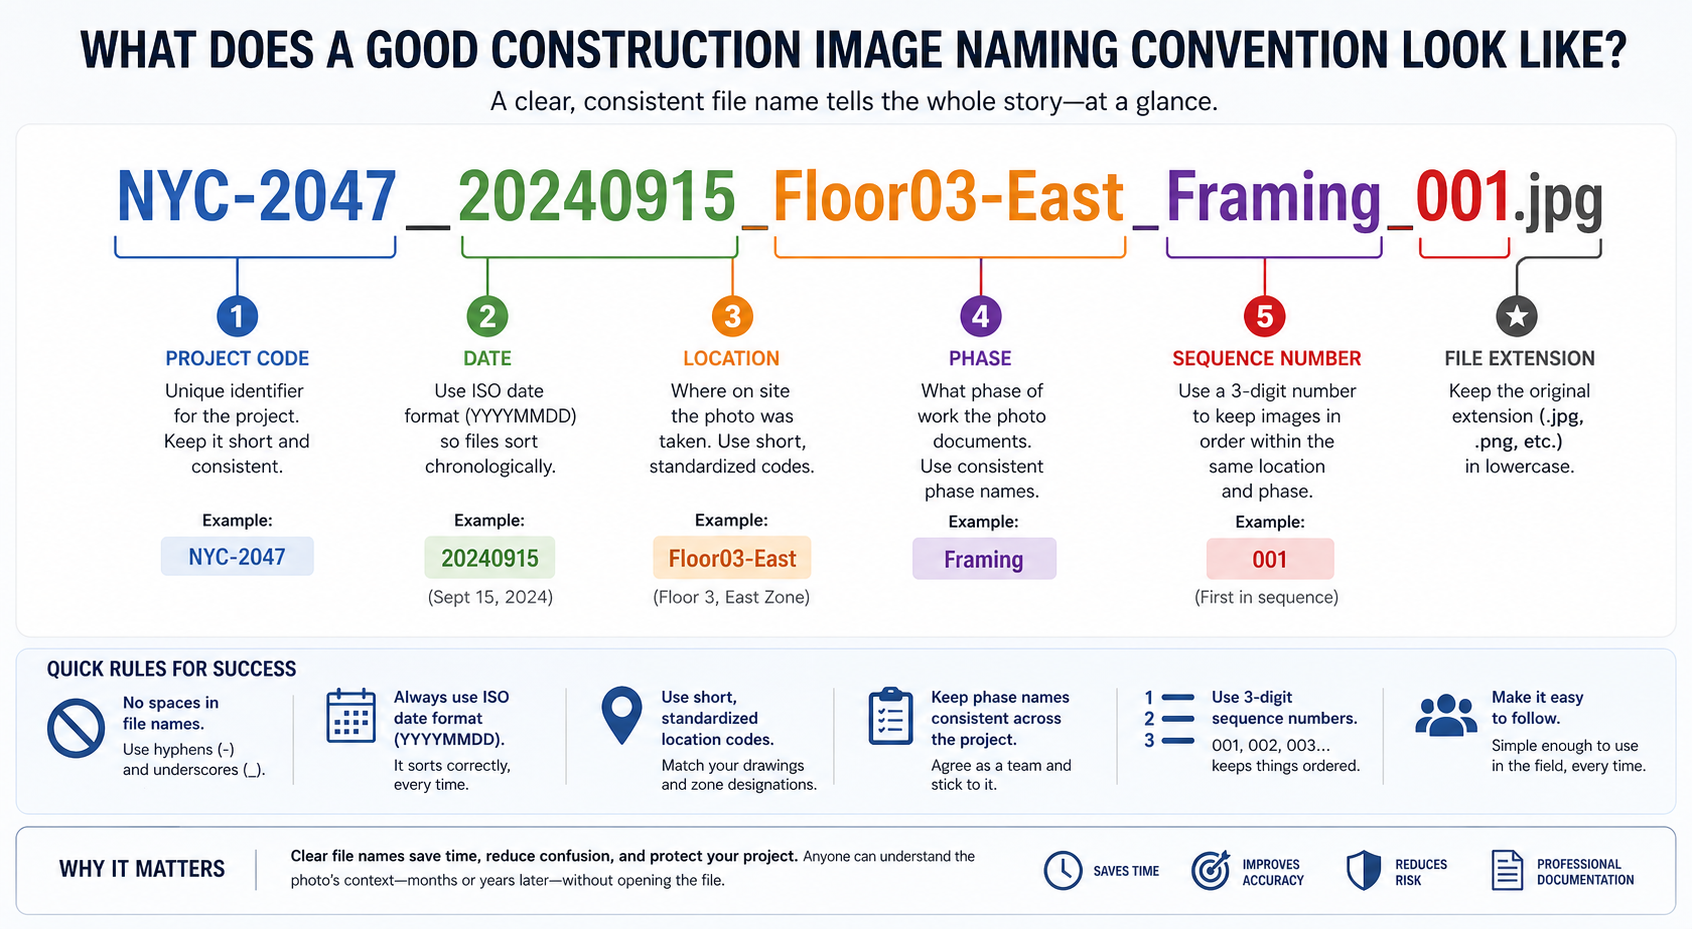
A naming convention is only useful if everyone on the team uses it the same way, every time. That consistency requires a structure that’s simple enough to follow under pressure but specific enough to be informative at a glance. The goal is that anyone, including a project owner, an inspector, or an attorney reviewing documentation months later, should be able to understand exactly what a file shows without opening it.
A reliable naming structure typically follows this pattern: ProjectCode_Date_Location_Phase_SequenceNumber. For example, a file named NYC-2047_20240915_Floor03-East_Framing_001.jpg tells you immediately which project it belongs to, when it was taken, where on site it was captured, what phase of work it documents, and that it’s the first in a sequence. Compare that to IMG_3847.jpg and the difference in professional value is obvious.
A few practical rules make naming conventions stick across teams. Avoid spaces in filenames since many project management systems and web platforms handle spaces inconsistently. Use hyphens within a field and underscores to separate fields. Always use the ISO date format (YYYYMMDD) so files sort chronologically by default. Keep location codes short and standardized across the project, ideally drawn from your drawing set’s room or zone designations.
How Should You Compress Construction Images Without Losing Documentation Quality?
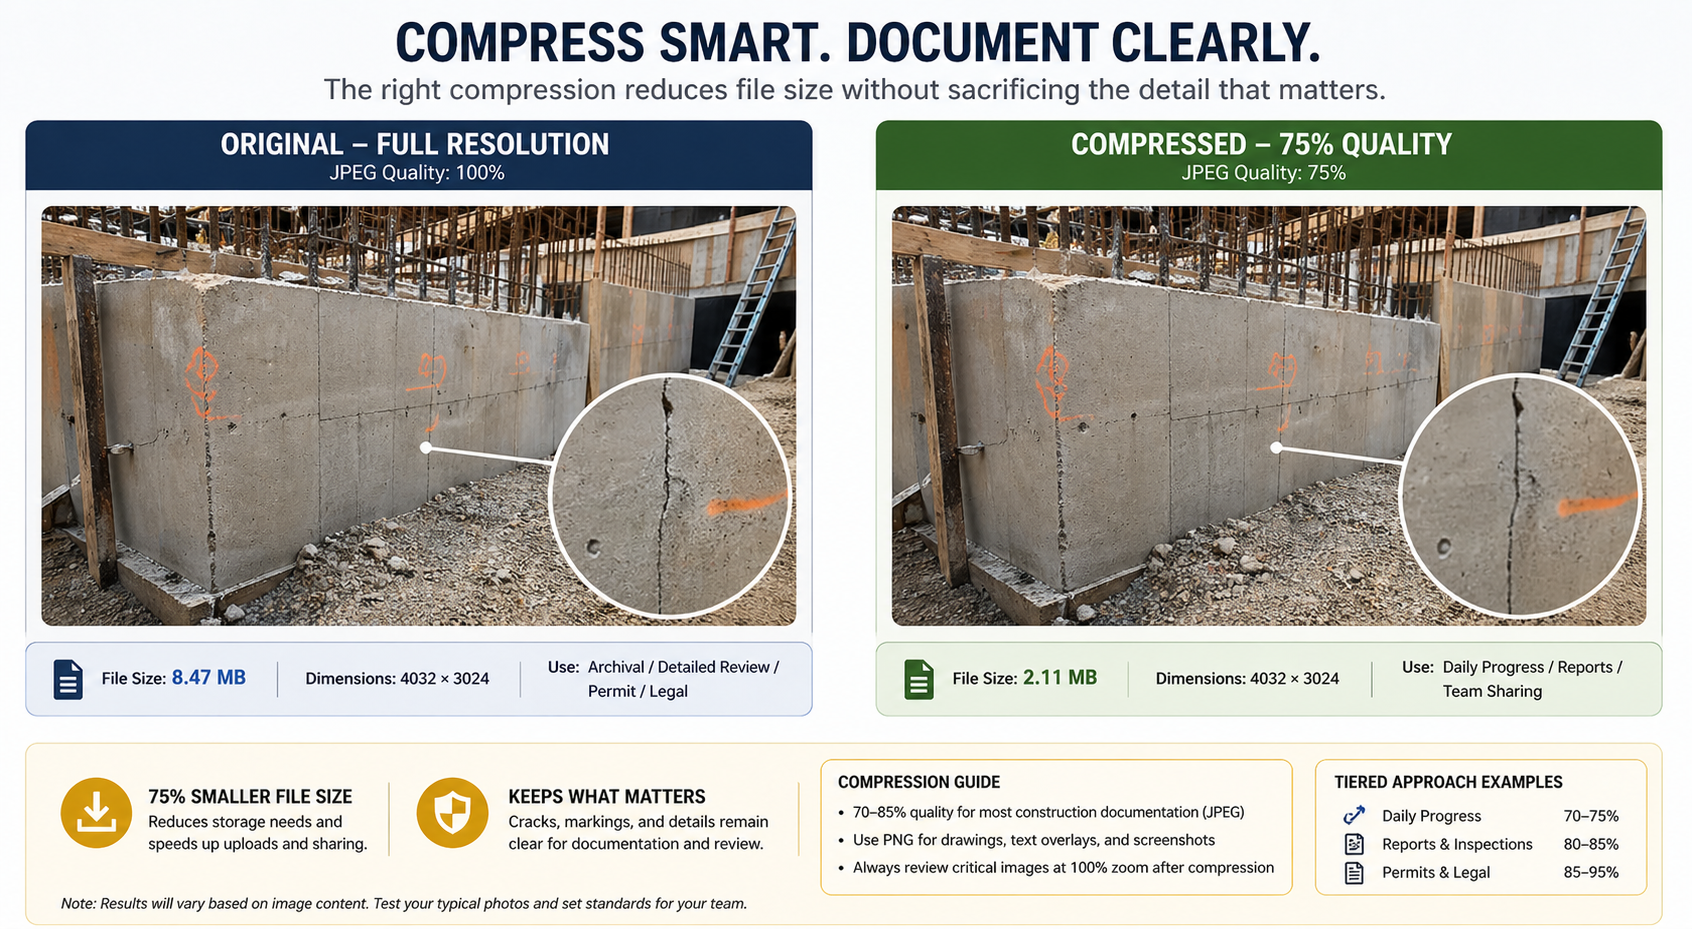
Compression is where many teams either go too far or not far enough. Over-compress an image and you lose the visual detail that makes it useful for documenting a crack in a foundation wall or a misaligned structural member. Under-compress and you’re carrying unnecessary file weight that slows your whole workflow.
For most construction documentation purposes, JPEG files compressed to between 70% and 85% quality retain sufficient visual detail for inspection, dispute resolution, and archiving, while reducing file size by 50% to 75% compared to the original. PNG format is best reserved for images that include text overlays, floor plan markups, or screenshots where sharpness around edges matters more than file size efficiency.
The right compression level depends on how the image will be used. Images destined for a project owner’s report or a permit submission may need to stay at higher quality than a quick daily progress photo shared in a team chat. Building a tiered approach, where you define quality settings by use case, gives your team a repeatable decision framework rather than leaving it up to individual judgment each time.
Tools like Adobe Lightroom, Squoosh, ImageOptim, or built-in batch processing features in platforms like Procore and Fieldwire allow teams to compress images in bulk. If your team is primarily working from mobile on site, setting your phone camera to a slightly lower resolution (such as 8–12 megapixels rather than the full 48 or 64 available on many modern smartphones) gives you a reasonable file size without needing post-processing for most documentation needs.
What Are the Real Workflow Benefits Teams Experience After Standardizing These Practices?
Imagine your project manager pulling together documentation for a subcontractor dispute on a San Francisco Bay Area mixed-use project. Instead of messaging three people to track down photos from three months ago, they open the project folder, sort by date and location, and pull the exact images needed in under two minutes. That’s what a working image management system delivers.
Construction litigation costs in the United States average in the hundreds of thousands of dollars per case, and the availability of well-organized photographic documentation is frequently cited by construction attorneys as a decisive factor in claim resolution. Projects with clear, timestamped, and labeled image archives are significantly more likely to resolve disputes favorably and at lower cost than those relying on disorganized photo libraries.
Beyond dispute resolution, the operational benefits show up daily. Faster uploads mean field staff spend less time standing at job sites waiting for files to sync. Clearer naming means new team members can orient themselves in the project archive without a guided tour. Compressed files mean your cloud storage costs stay predictable as project volume grows. These are small efficiencies, but they compound across a busy project schedule and across an entire portfolio of work.
Cloud storage costs for construction firms managing uncompressed image archives can run significantly higher than those using optimized workflows. Teams that implement compression and naming standards report meaningful reductions in storage overhead, with some reporting per-project storage savings of 40% to 60% without any loss of usable documentation quality.
Think about what it means when an owner in New York requests a full photo log for a city inspection on short notice. A team with a solid naming and compression system can export a clean, organized PDF or folder in the time it used to take just to locate the right files. That kind of responsiveness builds owner confidence and distinguishes professional teams from the competition.

What Naming and Compression Standards Should You Put in Place Before Your Next Project Starts?
The best moment to implement these practices is before a project begins, not after you’re three months in and drowning in 2,000 unlabeled photos. Start by documenting your naming convention in your project kickoff package. Include it alongside your RFI log template and submittal register so it’s treated with the same seriousness as other documentation standards.
Assign someone to own the photo archive. This doesn’t require a full-time role; it just requires accountability. On smaller projects, this might be the superintendent or project engineer. On larger projects, it’s worth building a brief daily photo log review into the closeout routine so naming and compression issues are caught before they pile up.
Run a short training session for field staff at project kickoff covering the naming convention and the compression settings you expect. Keep it to one page. Show them a correct example and an incorrect example side by side, and explain why it matters for everyone on the team, not just the office. Field staff who understand the downstream purpose are far more likely to follow the protocol consistently.
Frequently Asked Questions
What is construction image compression and naming?
Construction image compression is the process of reducing the file size of project photographs without losing the visual quality needed for documentation, inspection, and legal purposes. Construction image naming refers to applying a consistent, structured filename to each photo so that it can be identified, sorted, and retrieved quickly by anyone on the project team. Together, these practices form the foundation of a professional photo management workflow.
How does construction image compression and naming work?
Compression works by reducing the amount of digital information stored in an image file, typically through adjusting JPEG quality settings or using dedicated compression tools, until the file is smaller while remaining visually clear. Naming works by applying a pre-defined structure, such as project code, date, location, and phase, to every file as it enters the project archive. Most teams handle both steps either at capture (using camera settings and mobile apps) or during a brief daily review before uploading to a project management platform.
What are the main benefits of compressing and properly naming construction images?
The core benefits are faster file sharing, lower storage costs, easier retrieval, and stronger legal documentation. Well-named images allow anyone to locate specific photos in seconds rather than minutes. Compressed images upload and sync faster in the field, which matters on sites with limited connectivity. And during disputes or inspections, a clean, labeled photo archive communicates professionalism and provides credible, timestamped evidence that’s hard to challenge.
Who should use construction image compression and naming practices?
Any team generating construction photography should use these practices, from small residential remodelers in the San Francisco Bay Area to large commercial general contractors managing multi-phase projects in New York. Project managers, superintendents, field engineers, and even subcontractors who submit photos as part of their documentation obligations all benefit from following a shared standard. When everyone on a project uses the same convention, the whole archive becomes more useful to everyone.
When is the best time to compress and name construction images?
The ideal time is immediately after capture, either at the point of upload or during a daily photo review at the end of each shift. The longer images sit uncompressed and unnamed, the harder it becomes to apply accurate metadata from memory. Building compression and naming into the daily documentation routine, rather than treating it as a cleanup task, keeps the archive accurate and current without adding significant time to anyone’s day.
Ready to Bring Real Organization to Your Construction Documentation?
Messy image archives are one of those problems that seem manageable until a deadline hits or a dispute arises, and then the cost of disorganization becomes very real, very fast. The good news is that the fix isn’t complicated. A clear naming convention, sensible compression settings, and a brief daily habit can transform how your entire team handles project photography.
At GC Sherpa, we work with construction teams across New York and the San Francisco Bay Area to build the kind of documentation systems that hold up under pressure. Whether you’re looking to standardize your photo workflows, tighten up your project administration, or get your field team and office aligned on how documentation should work, we’re here to help.
Reach out to GC Sherpa today to schedule a consultation and take the first step toward a cleaner, faster, and more defensible project documentation process.